We remain fully operational. Our teams are working around the clock to ensure your deliveries continue safely.

DOWNLOAD THE APP


Customer Services
Copyright © 2025 Desertcart Holdings Limited
DOWNLOAD THE APP


🔥 Print Fast, Print Precise, Print Ahead 🚀
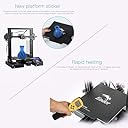
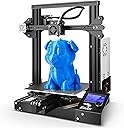
The Official Creality Ender-3 is a high-precision FDM 3D printer featuring ±0.1mm accuracy, a rapid 5-minute heat-up time to 110℃, and a sizable 220x220x250mm build volume. Engineered with patented V-Slot technology for smooth, quiet operation, it supports a wide range of filaments including PLA, ABS, and TPU. Open-source and backed by a 1-year warranty plus lifetime support, it’s the ideal tool for professionals and makers eager to elevate their 3D printing game.


| ASIN | B07JC93LKS |
| Batteries Required? | No |
| Batteries included? | No |
| Best Sellers Rank | 36,060 in Business, Industry & Science ( See Top 100 in Business, Industry & Science ) 44 in 3D Printers |
| Colour | Ender 3 |
| Customer Reviews | 4.2 4.2 out of 5 stars (3,273) |
| Date First Available | 11 Oct. 2018 |
| Included components | Printer |
| Item Package Quantity | 1 |
| Item Weight | 6.7 kg |
| Item model number | Ender 3 |
| Manufacturer | Creality 3D |
| Material | Filament: 1.75mm PLA, TPU, ABS, File Format: STL,OBJ,G-code, Hotbed Temperature: 110℃, Layer Thickness: 0.1-0.4mm, Modeling Technology: FDM, Net Weight: 6.7kg, Nozzle Diameter: 0.4mm, Nozzle Temperature: 255℃, Power Supply: 110-230V, Printing Accuracy: ±0.1mm, Printing Size: 220x220x250mm, Printing Speed: 100mm/s, Working Mode: Online or SD offline |
| Part number | UK-OFFICIAL-ENDER-3 |
| Product Dimensions | 44 x 44 x 46.5 cm; 6.7 kg |
| Size | Ender 3 |
| Special Features | 3D Printer |
| Wattage | 350 watts |
M**S
3D Printer
This machine is a great piece of equipment for a very good price easy to set up and very cheap to run have hrs and hrs of fun printing 3D models a very big 👍 From Me 😁
M**S
low-hassle printing
The Ender 3 came well packaged, I can't imagine it getting damaged in transit unless someone drove over it. Assembly was fairly straight forward. I took my time and spent perhaps 2 hours. Things not in the instruction manual? - 1) does your base frame sit flat? - mine didn't. Loosen the four bolts holding the side pieces (and remove two bolts holding the enclosure front plate) to allow you to readjust this. 2) Bed wobble. - mine wobbled side to side/tipping not good. This is easily fixed by adjusting the eccentric nuts. Turn the nut/washer thing with the supplied small spanner until there is no wobble. - this is also the 'trick' to solving loose play in other parts of the printer. 3) hot end carriage - also had wobble, also fixed by adjusting the eccentric nut. 4) bed leveling. - no instructions provided but this is fairly generic. Screw down the springs so they're fully compressed. Set the z axis endstop so the printer zeros a couple of mm above the heatbed (for me this was at the lowest if could be). Move the head to the centre of the board (you should disable steppers in the menu or at least move the head very slowly to avoid generating too much current and frying your electronics), lift the bed until it just catches a piece of paper. Next repeat this step at each four corners & keep repeating all corners until your happy. After this the printer just works for me. Hassle free printing - so far. For slicing software (stl -> gcode) I downloaded the free CURA which does now support the Ender 3 model (no need to adapt from a CR10). I'll be ordering or printing belt tensioners in the future though it's not needed right now. Out of the box this printer is miles better than the DIY 3d printer I've spent the last 2 years working on (great learning process but pain in the neck). Am I glad I didn't spend 3 times as much for a Prusa i3 Mk3? yes. Manual bed leveling is not a big deal. - though the option is there to stick on a BL touch sensor.
A**D
Ender 3 (Standard) ... Fantastic 3D Printer
I researched this printer for quite a few weeks, before taking the plunge ... watching endless YouTube channels (CHEP, Teaching Tech, Just Vlad, Nexi Tech) ... it was those guys that helped make the decision to buy the Ender 3 ... Boy what a fantastic printer ... the first prints came out better than I expected ... very smooth and better than some of the YouTube channels efforts ... This is a no brainer 3D Printer, at this price ... it's the best bit of Tech I've bought in years ... I am now making the classic 'LACK Enclosure' for it ... The filament I bought, at the same time, was the SUNLU 3D Printer Filament (Twin Pack) PLA+ 2KG (Black-White), 1.75mm ... this filament went out of stock for quite some time but I just checked again (April 2019) and it's back in stock ... MY ENDER 3 NOTES: The Sunlu filament: With the above Filament, I used 60Deg 'C' for the Bed Temp ... and 212 Deg 'C' for the Hot End ... I used this setup for all my prints and seems to work great ... THE ORIGINAL ENDER 3 FIBERGLASS BED: The removable (not genuine) "Buildtak" bed plate (with fiberglass bottom) was a bit of a devil to get a proper bonded print evenly ... it worked OK after a few tries ... it still didn't seem to want to bond on certain parts of the bed ... there were spots it didn't like to stick to ... I even tried Pritt Stick ... that seemed to work but what a mess! ... NEW BED: After watching a few more videos, I noticed that a lot of people were printing on GLASS ... so I investigated and found a great supplier, on the Bay (seller: gcc-systems) ... this type of bed was a 'Mirrored Glass Tile' but cut to Ender 3 bed size, 220x220mm (they cope for other printers too) ... it cost about £14 and damn was it worth it ... the official Ender 3 glass base is £28 (ish) ... this new glass bed just clips on as before, with 4 small bulldog clips ... You do not need to prime the base with hair spray, Pritt stick or any other product, in order to get good adhesion ... the glass just needs to be cleaned properly ... after it cools down you start to hear little noises as the print starts to release itself ... so much easier to get prints off glass ... you get a nice silky smooth underside too ... Glass Bed Pre-Print Washing Tip: The thing I was doing wrong, with cleaning the glass bed, was using de-greasing agents like Isopropyl (alcohol), etc ... no, no ,no, and no! ... these agents actually leave a 'very fine' film of 'something' and so prevents the filament adhering to the glass ... even if they say smear free there is still a deposit left behind ... I discovered that you only have to wash the glass thoroughly with washing up liquid and dry it off with a kitchen paper towel ... do not touch the clean surface afterwards (use the corners) ... but to see if it is clean enough you need to rub your fingers over the glass while washing it, so you get that squeaky feeling/noise ... then you know you're done ... that's all you need to do ... and BAM! with the first print the filament stuck like glue, everywhere it printed ... success! ... After I had done all of the above, I recently watched CHEP's video (Older ENDER 3 vs New ENDER 3 - 3D Printer Review/Comparison) ... he experimented with 2 x Ender 3 printers (from different suppliers) and he had the same issue with the Buildtak fiberglass plate ... he said it was actually the fiberglass base that had blind spots ... so it's possible it's not as level as the glass bed ... GENERAL TIPS: 1. To get the bed just right and level and without any slack (the main issue for wobbly prints) watch Just Vlad's 'Creality Ender 3 Pro - 3D printer - Unbox & Setup' as he is the only one, that I noticed, who shows you how to set the slack up on the slotted 'V' runners ... 2. To make the printer even quieter I cut a few thick square blocks, from the grey packing material and put them at each end, under the base supports ... damn if this doesn't reduce the noise by a ton! ... I have attached some photos of the first set of prints I did ... all downloaded from Thingiverse ... If you're just starting out or thinking of getting a 3D printer then this puppy will do you proud ...
C**I
Good quality
My husband is going to love this. Good quality and value
B**E
Worked for a bit...
Daughter saved up and spent all her pocket money on this, enjoyed using this for a bit, no issues whatsoever. Then it went wrong. Started getting spaghetti on every print. We tried everything to resolve the issue - so many hours spent following YT tutorials to re-level the bed; we replaced the nozzle; used that sticky stuff on the bed, changed filament, tried different files to print, replaced the bed. You name it, we tried it. Run out of ideas now. Very expensive for something that worked for such a brief period. Customer service has been abysmal too. They offered a few cursory suggestions, but now won't even reply to emails. Sad really - daughter was so excited about it and so engaged with it, and now it's just gathering dust. Not like we can afford to just magic up a new one either. Will definitely buy a different brand next time.
O**Y
Good for entry level consumers. Has some minor issues
Good printer overall. Can print with only PETG AND PLA. No more exotic filaments. But this is fine for most people. It is quite slow and sometimes has a bit of trouble with adhesion. Its frame is very stable so I had no Z wobble. Great printer for entry level consumers but not for more experienced people.
J**Z
Pas mal pour le prix.
H**A
El lector de tarjeta de memoria no funciona, ya está levantado el reporte de falla con el vendedor, se le enviaron videos de la falla y no da respuesta, incluso ya me ofrecí a llevarla al centro de servicio del vendedor y nada La impresora imprime con buena calidad, por medio del puerto mini usb En pocas palabras la impresora vale la pena comprarla, pero con otro vendedor que si respete la garantía
T**E
Als blutiger Anfänger hatte ich mich davor gesträubt, einen 3D Drucker ohne Autolevel zu kaufen, aber am Ende hat der Preis mich einfach überzeugt, und die Creality Marke war bei mir schon länger positiv im Kopf. Der Ender 3 kommt in einer großen, gut gepolsterten Box und ist teilweise bereits montiert, allerdings kann ich den hier von anderen Käufern genannten "Aufbau in 30 Minuten" nicht zustimmen... bei mir hat es dann doch 2 Stunden gedauert, da die Anleitung teilweise fehlerhaft war und ich deswegen den Drucker nochmals auseinander nehmen musste, ehe alles passte. Insbesondere der Treibriehmen für den Druckkopf war eine Geduldarbeit. Neben dem Drucker und der gedruckten Anleitung sind noch einige Goodies mit dabei: Eine SD Karte mit USB Kartenleser, Werkzeug zur Montage, eine Elektrozange womit man Plastik sehr gut trennen kann und ein fast unerlässlicher Metallschaber, um Plastik das etwas zu fest an der Bauplatte hängt zu entfernen. VORSICHT hierbei- Die Ecken des Schabers sind scharfkantig! Besser etwas rund schleifen damit die Bauplatte nicht beschädigt wird! Nach dem Aufbau ging es daran das Plastik zu laden- Es liegen etwa 5m weißes PLA dabei, um den Drucker schonmal anzutesten, allerdings reichen die nicht lang. Empfehle daher jedem direkt schonmal eine 1kg Spule mit zubestellen. Das Filament zu laden war erst eine fummelarbeit, aber nach und nach bekam ich den Trick raus, das man das Plastik "anspitzen" muss um es gut einfädeln zu können. Schließlich muss das Gerät per Hand gelevelt werden, das geht über die üblichen vier Handräder unter der Bauplatte- Es gibt online etliche Tutorials wie man das am besten macht, und nachdem man ca. 10-30 Minuten damit verbracht hat, druckt das Gerät sehr gut und gleichmäßig und muss auch für die nächsten Tage oder gar Wochen nicht neu gelevelt werden. Schwachpunkte des Enders sind allerdings auch vorhanden, allen vorran die Bedienoberfläche. Das Gerät wird mit einem Knopf gesteuert ähnlich einer Mikrowelle oder Waschmaschine, wobei man durch drehen Menüpunkte auswählt und dann auf den Knopf drückt um sie auszuwählen.... Das ist nicht nur langsam, sondern oft habe ich versehendlich eine andere Option ausgewählt als ich eigentlich wollte, weil beim Drücken sich der Knopf leicht gedreht hat. Ärgerlich, wenn der Drucker plötzlich etwas ganz anderes druckt als gewollt! Ansonsten kann ich nur sagen was der Drucker NICHT hat: Keine Automatische Levellung, kein Glasbett oder Magnetisches Bett, keine Abdeckung für die freiliegenden Kabel, keine Wifi Funktion und keine Spannvorrichtung für das Filament. Das gute am Ender ist, das sich das alles nachrüsten lässt. Autolevel-Kits gibt es für etwa 70 Euro zu kaufen, Glasbetts und Magnetische Betts etwa für 30 Euro- Kabelabdeckung und Spannvorrichtung habe ich für meinen schon selber gedruckt, diese gibt es einfach auf Thingyverse zu finden.
M**O
Prodotto di buona qualità, si possono sentire con mano tutti i componenti da montare, si può sentire la qualità del prodotto con mano. Molto semplice il montaggio (libretto delle istruzioni chiaro), mi ha occupato circa 40 minuti. Ho voluto controllare a comparatore se effettivamente era tutto in squadro, ed era effettivamente così. Ho avuto un problema con il sensore di finecorsa dell'asse Z, era molto variabile, ciò causava una adesione errata sul piatto. Ho trovato il problema, provando a sostituire un finecorsa degli altri assi con quello dell'asse Z, infatti il problema su quell'asse era sparito, ho deciso quindi di sostituire il sensore di finecorsa dell'asse Z con uno più performante. Parametri standard per stampa PLA in estate (stanza non raffreddata): Temperatura ugello: 210° Temperatura piatto: 60° Adesione: 3 linee di BRIM Risultati perfetti, anche su lunghe stampe. Parametri standard per stampa PETG in estate (stanza non raffreddata): Temperatura ugello: 250° Temperatura piatto: 65° Adesione: 3 linee di BRIM Risultati ottimi, fa parecchia adesione, anche troppa. Nel complesso, rapporto qualità prezzo molto vantaggiosa. Consigliatissima
C**N
Je suis un gros débutant en impression 3D. J'ai suivi les conseils d'un copain qui a une ENDER 3. Profitant des promo, j'ai opté pour la ENDER 3 V2 et constaté qu'il y a une grosse communauté autour de cette imprimante et de l'impression 3D en générale. Alors le produit est TRES bien! Les profils en alu inspirent confiance et solidité. Le montage n'est pas compliqué, faut seulement faire un peu attention. En cas de difficulté pour le montage ou le calibrage vous trouverez sans difficultés des tutos en vidéo sur le net. Les deux points négatifs que je vois pour l'instant: -La lenteur d'une impression (mais ça c'est pas la faute de la ENDER 3 V2, c'est le "défaut " de l'impression 3D. Et encore, tout est relatif, car pour des pièces peu volumineuses ça peut aller "vite". exemple: une pate en forme de S de 25mm de large et de 3 mm d'épaisseur, il faut compter 1h40 d'impression. Mais une fois terminée, c'est TOP! -Le bruit du ventilateur. Allez c'est le seul vrai "défaut" de la machine. Le ventilateur souffle! et donc il fait du bruit (attention, c'est pas le bruit d'un aspirateur non plus) mais c'est un peu ennuyeux. Il ne faut pas mettre l'imprimante dans sa chambre si on veut dormir tranquille. Mais honnêtement, c'est pour trouver un point négatif au produit. Et le résultat? Punaise, je suis bluffé! c'est HYPER propre! pas parfait bien sur, puisqu'il ne s'agit pas de moulage, mais le résultat est très fin! Je ne peux que recommander cette imprimante à ceux qui débutent comme moi! BRAVO CREALITY vous avez fais du bon boulot!!!!
Trustpilot
2 months ago
1 month ago