We remain fully operational. Our teams are working around the clock to ensure your deliveries continue safely.

DOWNLOAD THE APP


Customer Services
Copyright © 2025 Desertcart Holdings Limited
DOWNLOAD THE APP

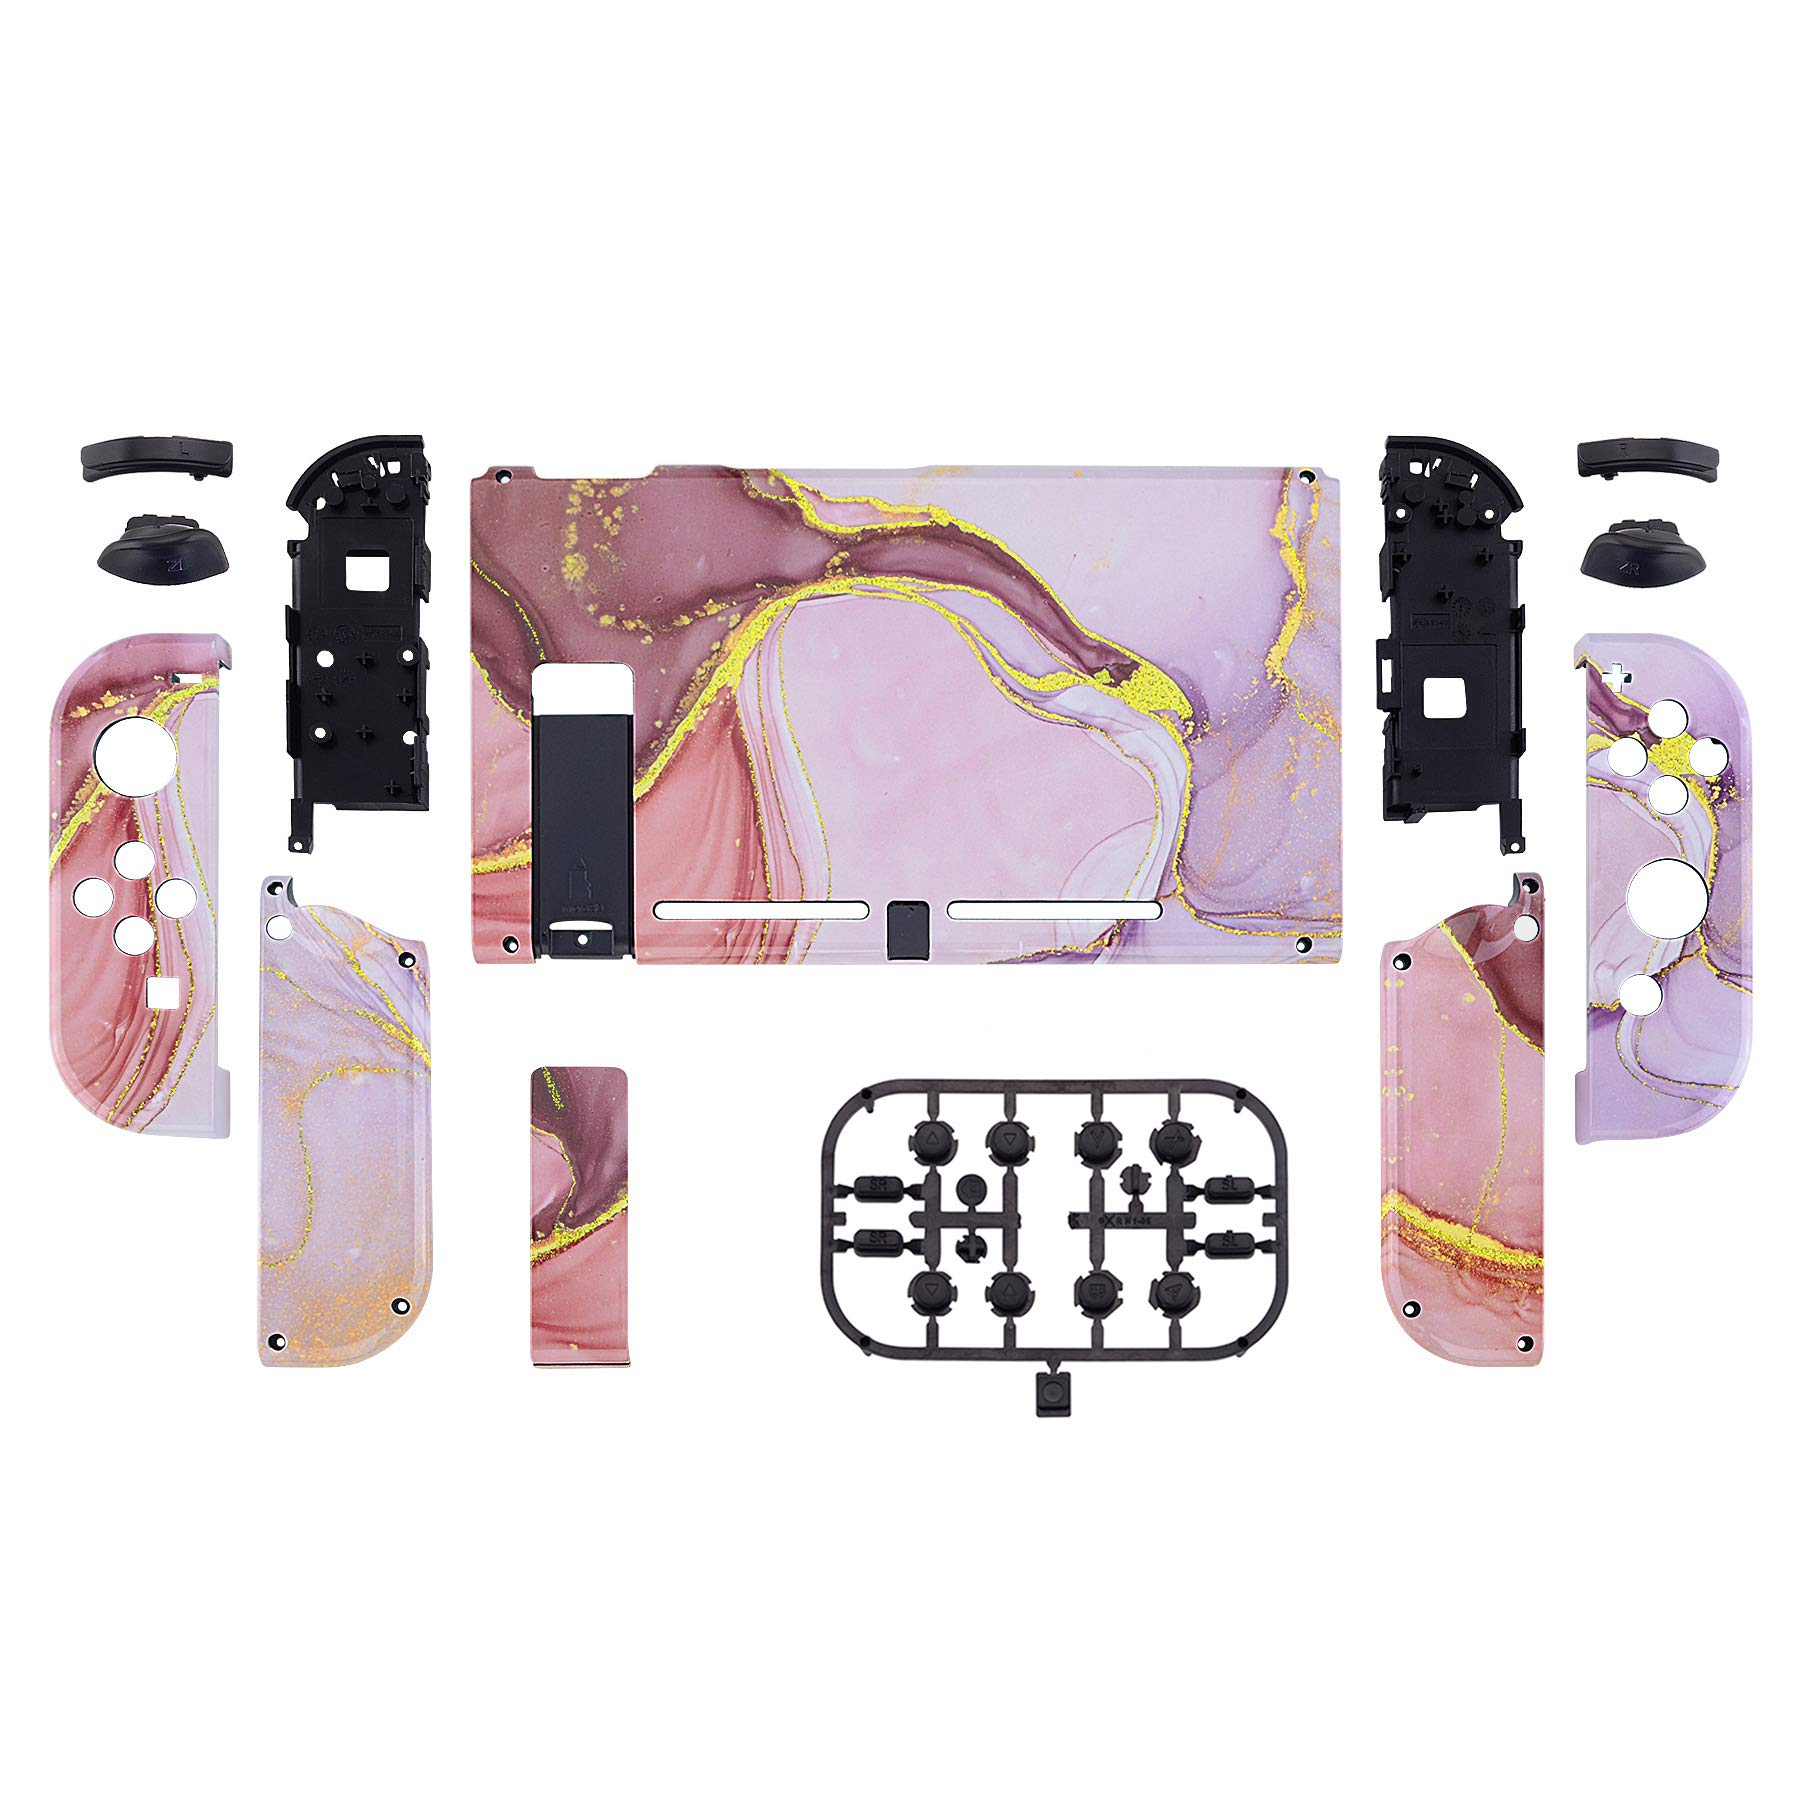


🎮 Level up your Switch’s style and feel with cosmic flair!
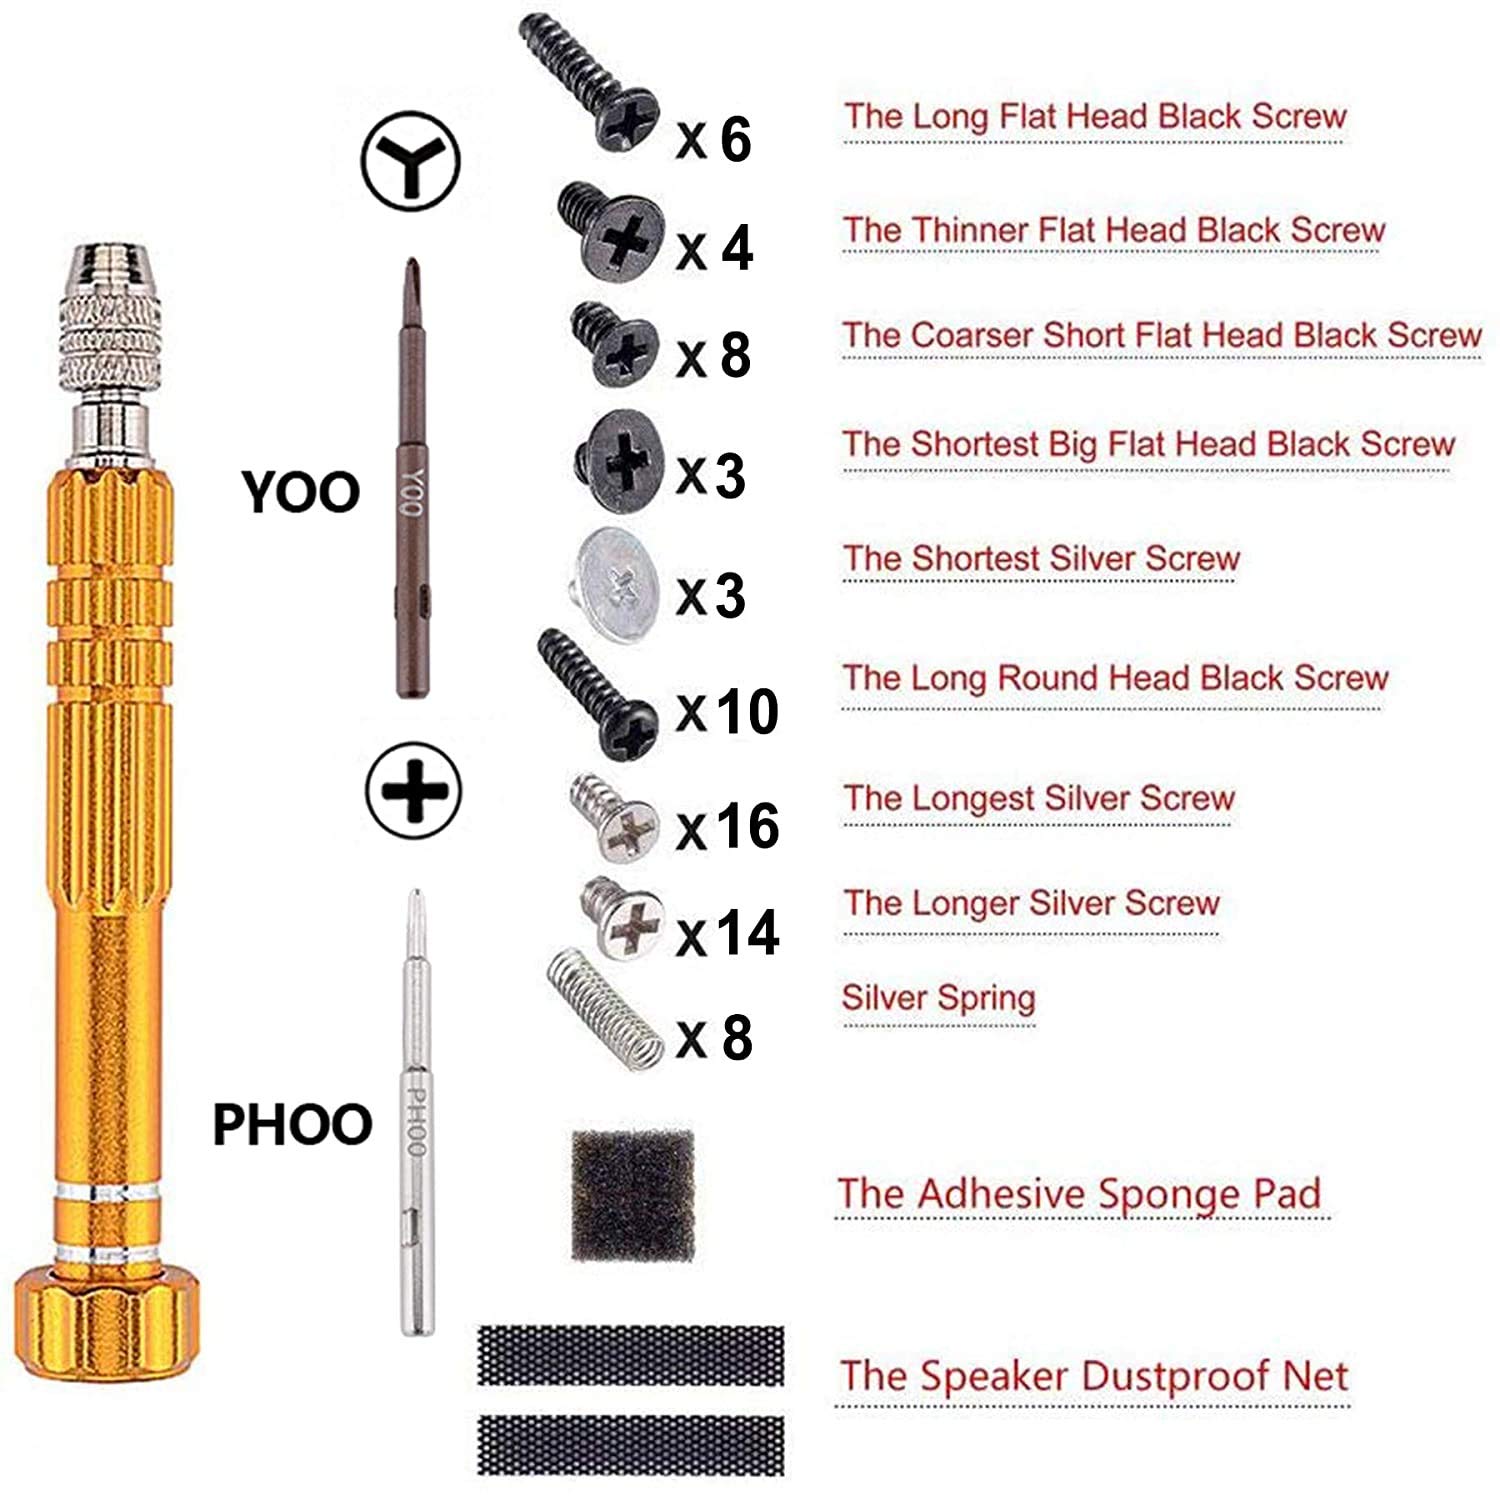
The eXtremeRate DIY Replacement Shell Buttons kit offers a premium ABS custom housing and full button set for Nintendo Switch, featuring a stunning cosmic pink gold marble effect. Designed for gamers with moderate DIY skills, it includes a pro-grade screwdriver set and a detailed video guide for precise installation. This kit enhances durability, improves Joy-Con fit, and delivers a unique, stylish upgrade to your console.


| ASIN | B08LZPSBT1 |
| Best Sellers Rank | #7,554 in Video Games ( See Top 100 in Video Games ) #112 in Nintendo Switch Faceplates, Protectors & Skins |
| Brand | eXtremeRate |
| Color | Cosmic Pink Gold Marble |
| Customer Reviews | 4.5 out of 5 stars 1,960 Reviews |
| Enclosure Material | Acrylonitrile Butadiene Styrene (ABS), Plastic |
| Finish | Glossy |
| Hardware Platform | Nintendo Switch |
| Item Dimensions W x H | 4.53"W x 1.97"H |
| Item Height | 5 centimeters |
| Item Weight | 65 Grams |
| Manufacturer | Extremerate |
J**Y
Really nice quality and the material feels great.
I should preface by saying you should either have a good guide or you should know what you're doing before installing these because the joycons are tricky to do without damaging anything. If you're a novice, research the repair before buying so you don't get in over your head. The material isn't the same smooth plastic as the standard switch joycons, this stuff is a soft vinyl covering the plastic frame. It feels softer to the touch and feels really nice to hold, even after the clammy hands start kicking in. It feels like it might scratch easily if it's not kept well, but I haven't had any issues with that, and I transport it almost primarily unprotected in a backpack pocket. Take from that what you will. Decal print aside, the actual molded plastic is durable and the kickstand latches haven't broken for me after a decent amount of use, and show no signs of significant wear (this has been a problem I've seen with other brand housings). After the replacement, the joycons actually seem to fit more snugly in the Switch's side-rails which I appreciate because the original housing felt just a bit... wobbly? Just a bit though. Results and experience may vary. The screwdrivers this kit comes with are *really nice*. It's a driver handle with two separate screw bits, and speaking as a professional repairman, it's a way higher quality than you'll usually find in DIY kits. This is closer to the iFixit brand stuff in quality. The original Switch buttons look better in my opinion because the white lettering is far easier to see, but that's neither here nor there and spare parts are never a bad thing. I also left the joycon SL/SR 'bumper' buttons as the original red/blue because this kit only comes with black and that seemed like it'd be hard to see quickly. Looks a little gaudy, but I rarely see them anyway. Last nice little detail about the Switch's rear housing plate, the kit does come with a replacement dust mesh, so you don't have to tear the one off your original housing plate and try to stick it back on. Overall very, very happy with this housing replacement. Looks great, feels great, and friends have thought much the same.
R**N
If you want woodgrain look, can't go wrong here
Whooboy I got myself into trouble wanting to install this. So I had let a friend borrow my switch, unforunately when I got it back the back of the case was cracked and the fan was dying, so I decided I would just get an interesting replacement case and install it along with a new fan Dang are the screws and cables in the switch so small. I am so glad there are extra screws just incase. Just be very careful, take your time, and MAKE SURE YOU SEPERATE AND LABEL YOUR SCREWS don't force anything, if it doesn't seem to fit, then you might have the wrong screw or thing Still, I was able to do it all and I like its look! Fits well for my switch on my MCM livingroom to have the faux wood grain! It is holding up real well on the joycons!
M**N
I like it
Good product and it looks nice, definitely take your time putting this together. The plastic threads on the hand grips that connect them together broke easily but it is plastic so can't complain that much. It comes with a ton of new screws in case you lose some but I just used the original screws.
S**E
So freaking pretty!!!
I’m absolutely in love with this shell replacement. I’m not gonna lie; it wasn’t the easiest install, but I expected that after reading the product description. The hardest part is replacing the joy-cons because of the buttons, joystick, and a ton of screws and springs to keep track of but it is totally worth it. It comes with extra screws, springs, and buttons which made the process a million times less stressful considering I had backups in case I lost something (I definitely did). Take your time and look up videos on YouTube and you’ll be fine. I can already tell the design will rub off after a lot of usage, but I put a clear case on mine to hopefully make it last longer. Highly recommend if you’re up for the challenge. Side note: I don’t know what’s up with all the bad reviews on the screwdriver cause mine was fantastic. I had no issues screwing or unscrewing anything. It doesn’t have that magnetic hold like other screwdrivers, but I used tweezers to pop a screw or spring into place so it wasn’t a big deal. It says estimated time to install is 4 hours, but it only took me 2. I thought I knew what I was doing and skipped the second part of the video but had to go back because I didn’t lol. That’s why it took me so long. 10/10 product. I highly recommend.
S**.
Perfect Fit, Great Quality
The replacement shell is a perfect fit. Everything snaps together with ease and the screwholes are all drilled properly. Swapping out the shells was not too difficult, but I definitely recommend watching a video on YouTube if it's your first time. The only real difference in quality I notice between the original Nintendo shell and the eXtremeRate shell is that the eXtremeRate back plate has a bit more flex to it. After installing, you can feel a small pocket in the center that bends just a tiny bit when you squeeze, but this is very inconsequential in my opinion. I am still excited to show off my new custom Switch. :) I bought a separate set of replacement buttons because the shell comes with black replacement buttons, and I just didn't think that suited the pink/purple/gold marble design very well. The buttons are also by eXtremeRate and are perfect fits. The home button comes in two parts and was kinda fiddly to put together. I ended up supergluing the two pieces together because for whatever reason, the gold button did not want to stay in the opaque casing for it. I've bought other eXtremeRate products for various consoles, and they have all been very consistent in quality and fit. I absolutely recommend this brand to anyone who is looking to customize their gaming systems!
M**A
I love everything about it
I bought my switch and this shell set summer of 19, but never got around to installing this thing because I felt I was too busy with work and school. Admittedly, I was also hesitant about opening up the devices, but I finally took the leap and went for it. First thing to note, the y-head screwdriver that came with the set did not fit well (I think it was too large) and was beginning to strip my screws. I bought a separate set here on amazon, and everything worked out great. The installation was a good learning experience, I worked slow and cautiously. The videos are extremely helpful. Second thing to note, my replacement kickstand that came with this set did not sit flush with the backplate. I fiddled with this for a while and tried to make adjustments, but to no avail. At first, I thought it might not be a problem, but after seeing how it wouldn't fall into the dock seamlessly, I decided to just use the original kickstand which works great because it compliments the wood design well. Third, I have noticed a few issues with my joy-cons since making the change, but for all I know, it could be from my own mistakes. One complication is that my L trigger just gave out suddenly. It wouldn't spring back up and was constantly engaging. Then it suddenly popped back and worked fine. I also didn't have too much issue with joy-con drift before changing the shell, but it has happened once since I installed the new shell 2 weeks ago. All-in-all, I still love this thing. I love the personalization. Take your time and be cautious and everything should work out. I have ordered a second set for my other joy-cons.
J**.
Great shell! Take your time!
The actual shell is beautiful and i got my dream stardew valley themed switch! The process wasnt as bad but i did break my first pair of joycons but that was on me for not being careful enough :/. But if youre really careful and gentle and you organize your screws well this process was pretty easy! Again looks great and turned out amazing with no problems! Couple of reminders/tips: 1. Take pictures so you know what screws go with what. Although they look the same put the screws back where you found them! I used and labeled mini solo cups to organize my screws 2. Dont tighten the screws too tight otherwise sole buttons wont be pressable. 3. Take ur time, the screws on the console is pretty tight but unscrew them slowly and carefully. 4. Dont rush and everything will be A okay! 5. Use your own tools, the tools that the kit comes with sucks Anyways good luck guys and hope you guys are satisfied with that review!
P**F
Must take apart joy-cons and switch, but worth the effort.
Warning: Do not buy if you are not prepared to spend an hour or two putting this all together with very tiny screws! You will also have to take it apart very gently because of the battery connections and all the electronic ribbons in the joy-cons! When I bought this, I envisioned it more like a phone case, when in fact, it is a completely new shell for the switch+joycons. It comes with many spare screws and buttons and a nice control screwdriver(magnetic) with the two bits you will need to open up your device. It does take time, but the shell was made nicely. You don't have to force the parts together and it is an exact match to the normal shell a switch has. It is a very smooth, almost soft plastic. It honestly looks gorgeous and I am glad I took the time to assemble it. Tips: 1. Take pictures while taking it apart, so you know how to put it all back together. Every time I took a layer apart in the controllers, I took a snapshot and was able to correctly assemble it. 2. I used tape to hold the buttons in place (on the outside of the cover on the joy-cons). If you don't, it can be very frustrating and they pop out constantly. 3. Be aware of what bit you need for what screw you are working on! I had to swap between the two bits provided to open everything up. One is a very very small phillips (00?) and the second is a triwing bit. 4. Don't force it apart! If it isn't coming open, then check again for a screw you haven't undone! 5. You only need to unscrew the center screw on each side of the switch, where the joy-cons click in. You don't need to unscrew all of the on the sides. (As well as the four in the back, two on the bottom, one on the top, and one hiding underneath the tab that props the screen up) 6.Don't be afraid to walk away if you are frustrated. There are many delicate components inside and you will need to patient and careful. I would give this product five stars, but it did not come with any instructions. Don't be afraid to look up videos online for help!
Trustpilot
4 days ago
1 week ago