


🚀 Elevate your DIY game with the ultimate compact microcontroller!
The ELEGOO Nano Board CH340/ATmega328P is a compact, breadboard-friendly microcontroller board running at 16 MHz. Compatible with Arduino Nano V3.0, it features multiple power input options and a CH340 USB-to-serial chip for easy connectivity. Ideal for both beginners and experts, it offers enhanced analog inputs and a small footprint to maximize prototyping space.


| ASIN | B0713XK923 |
| Best Sellers Rank | #141 in Single Board Computers (Computers & Accessories) |
| Brand | ELEGOO |
| Built-In Media | [Mini-B USB cable] |
| Compatible Devices | Arduino Nano V3.0, various devices with Mini-B USB, and devices compatible with the Mini or Basic Stamp pin layouts (such as certain boards from Arduino, Adafruit, or SparkFun) |
| Connectivity Technology | USB |
| Customer Reviews | 4.5 out of 5 stars 1,965 Reviews |
| Item Dimensions L x W x H | 1.9"L x 0.4"W x 0.7"H |
| Item Height | 0.7 inches |
| Item Weight | 0.1 Ounces |
| Manufacturer | ELEGOO |
| Memory Storage Capacity | 512 KB |
| Model Name | Nano |
| Operating System | FreeRTOS |
| Processor Count | 1 |
| RAM Memory Installed | 32 MB |
| RAM Memory Technology | SRAM |
| Total Usb Ports | 1 |
| Wireless Compability | 802.11b |
C**.
Great tiny project board! Works out of the box on Big Sur
What a great value - 3 nano boards for basically $5 each. It's a real ATmega chip, and even though the USB driver chip is not the more-ubiquitous FT brand, drivers are not needed in 2021. I love that it's a tiny arduino-compatible board that is very inexpensive and has only what I need to make a project out of it - no pin headers, just a USB connector, the basic LEDs, and through-holes. The unregulated power input is awesome (standard for nano style), I can just connect it to a 12v DC wall adapter that the rest of my project is already using. It's got a bunch of digital and analog ports, including 6 pulse-width modulation ports. I'm just getting back into Arduino, so this is probably pretty standard stuff, but it's cool to see so much potential in a tiny computer that is now the least-expensive part of almost project. 2021 update for Macs using Big Sur - it works out of the box now. Don't install any extra drivers, just connect it and install Arduino IDE 1.8.3 (marked experimental version). In Arduino IDE, set Board to "Arduino AVR Boards > Arduino Nano" and for Processor choose "ATmega328P". For Port, choose the one that starts with "/dev/cu.usbserial" or "dev/tty.usbserial" and then you're good to go. My only complaint about this board is the USB mini style connector. It would be nice to see micro USB or even USB-C, but it's a really minor thing - cables are not expensive and most of us have an old USB mini cable collecting dust somewhere.
T**R
Super Value
I ordered two sets (six Nanos). All tested perfectly. For MAC, use the web address on the order page and download the NANO files, the serial driver will be in that package. It won't be recognized in your Arduino IDE otherwise. Simple process to download and unzip and execute. Restart and you now have a port you can work with in the IDE. Choose Arduino Nano and make sure the AT mega328P processor is selected so you can talk to the boot loader successfully. The download package has all the instructions, it's very easy and worked just as they said it would on my MAC. I tested all six in the following manner: plug in and ensure l13 is blinking (comes preloaded with "Blink"). load program of your own choosing and check to see if it works (program should activate l13 and interact with serial console) press reset button to make sure the Nano reset button works reload Blink and check Boom - you have an awesome $4.26 Arduino ready to do great things for you. Again all of mine tested perfectly. You have to solder the headers in and the space is limited so be careful. Not the best platform for prototyping but, once you've figured out what you want your Arduino to do, these are my main "deployment" Arduino platforms. Cost efficient (They're a steal) and very space saving. I highly recommend for trouble free, super inexpensive Arduino deployment. UPDATE: I ordered six more nanos, performed the same test as above and all tested perfectly. I'm stocking up while they are inexpensive. The quality consistency of this particular product is excellent. I have had one nano blinking for two weeks now nonstop. Just checking to see if it dies but it just keeps going and going and going...
D**S
Nice product set and price, worked first time!
I'm still learning the depth of uses for the basic Nano, and bought these Elegoos in a pack of 3 because of the 328 chip and flexible configuration offered by the included pin sets. Simply: they all powered up and showed that they are functional via the the blinking LED sketch pre-installed, and took my IDE sketch first time every time. For my small, in-a-box sensor controller, they're ideal.
H**N
Your Arduino IDE version changes what board/processor you need to select.
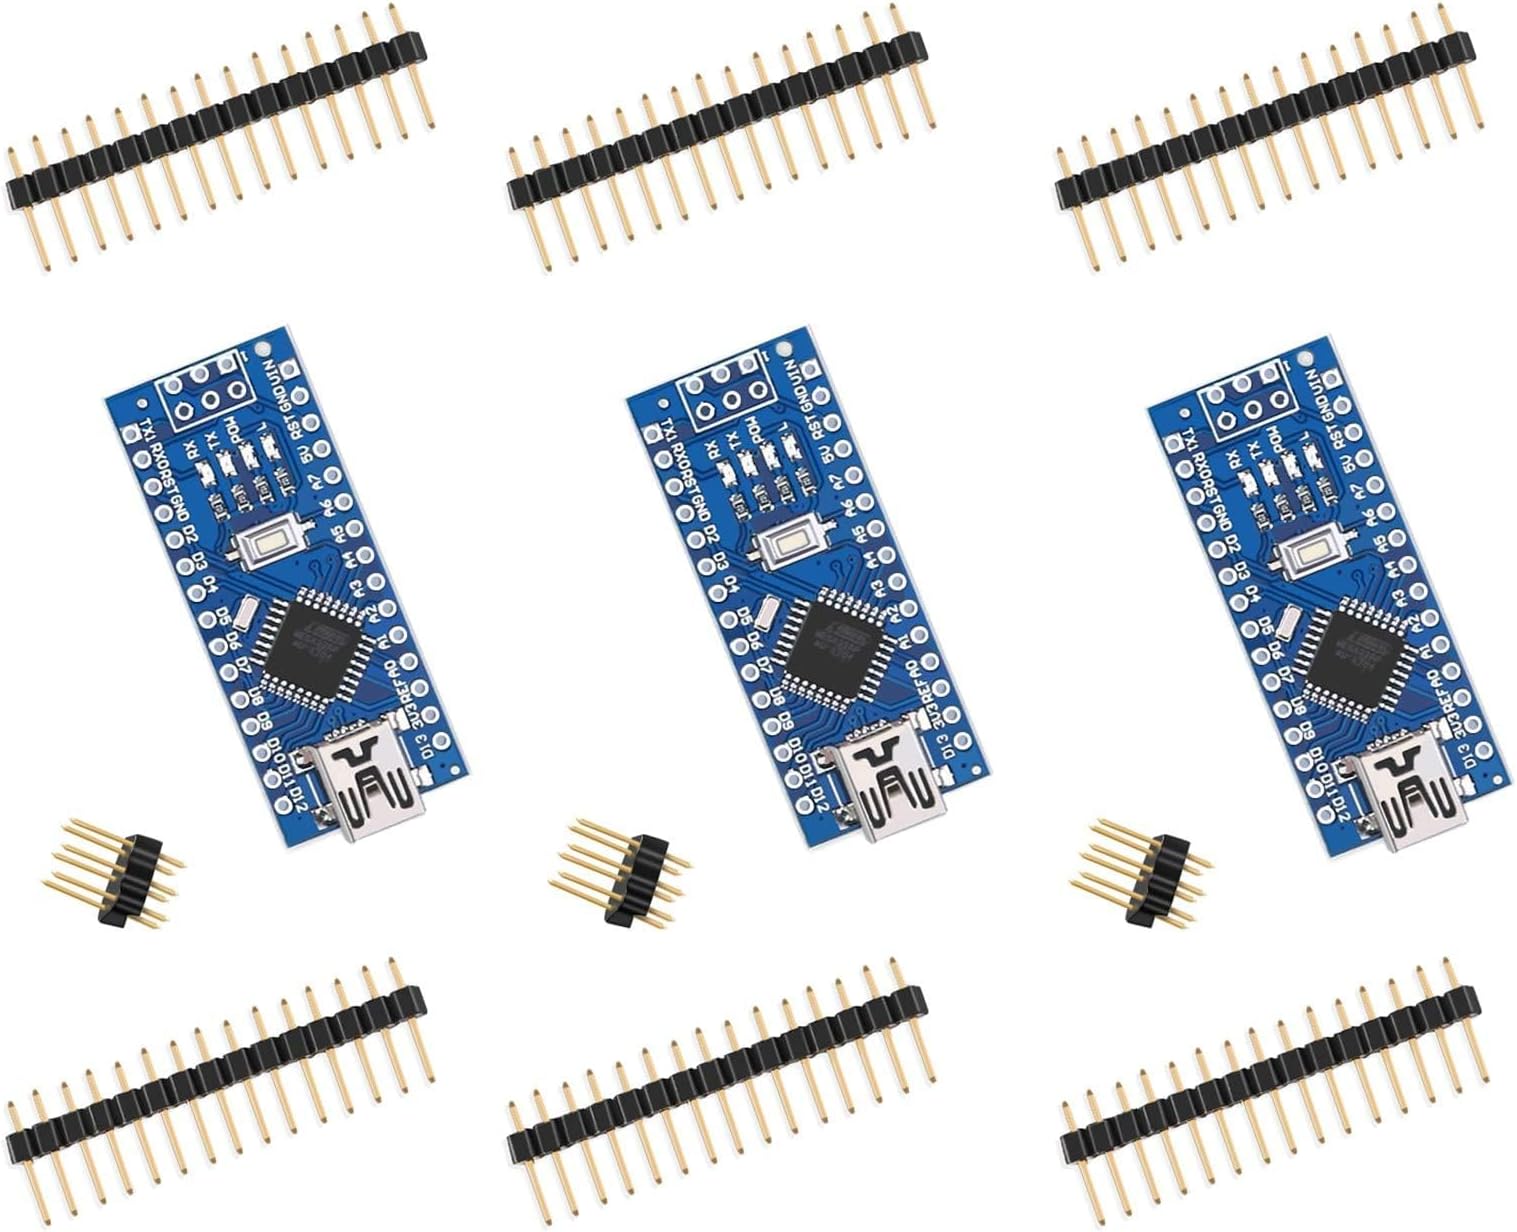
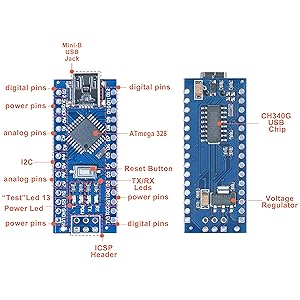
As for the board: so far so good. Cheap, works as intended, an annoyance to setup as others have mentioned, and I'd rather have a micro USB, but overall I'm satisfied. One star off for the difficulty in setup (read on for how I got mine to work; it literally involved a random hunch), otherwise a good board for permanently embedding in a project as its small and inexpensive. ----- Instructions for use current as of 6/27/2020 ----- Just got one of my boards working. I was following the advice of other reviewers who mentioned you need to select Arduino Nano as your board and ATmega328P (Old Bootloader) as your processor. Turns out this might have worked in the past, or for particular people's setups, but it did not work for mine. Here's how I got things to function: First off, I'm using the 1.8.13 version of the Arduino IDE, which is the most current as of this review (6/27/2020). I can't guarantee this is what caused the issue, but I'm going to assume its part of it. I'm running Windows 10 Home, 64 bit, version 10.0.17134 Build 17134. Your mileage may vary if you are running a different version or a different OS entirely. When I initially plugged the nano into my computer, I could not see any COM port appear. I had already installed the CH340 drivers (you can do so from elegoo.com/download, or from Sparkfun at https://learn.sparkfun.com/tutorials/how-to-install-ch340-drivers/all). Turns out my first mistake was a simple one: I didn't use a data cable. The cable I found lying around turned out to be for power only. Keep this in mind. The way you can tell is if the Nano starts running the LED blink program, but is not discovered by your computer. The blink program will run as it comes preloaded so it will run when the board is powered on. This means either you have a power-only cable, or somehow the data pins have been damaged (less likely that only those pins specifically would be damaged, but who knows... its possible). Switching out the cable fixed the discovery issue. I still couldn't upload to the board though. Once the board was discoverable, I then began following video instructions from the Sparkfun page I linked to above. They said to re-run the CH340 driver executable, uninstall the drivers, then reinstall them. This time I got a message saying the drivers had been installed correctly, rather than having been "pre-installed" as was mentioned before. I tried uploading again, but no luck. Still, the drivers do need to be installed correctly so this was probably a secondary issue. Who knows, but I'm going with that. I could now see a new populated COM port, so I knew the Nano was being seen now. I once again set my IDE settings to Arduino Nano as the board, ATmega328P (Old Bootloader) as the processor, and finally the new COM port as the port. Still nothing. As a last ditch effort, I tried switching the board to Arduino Uno. "Done uploading." What do you know... it worked. Why? Who knows... but it did. I hope this helps somebody else out with this odd situation.
K**S
Perfect for small projects
I used this in my 3d printed Iron Man helmet to control servo motors for the face mask and eye lights. Works as an amazing and cheap replacement for the Arduino Nano as long as you don't plan on using as much processing power
J**.
I used many of these in recent months without a problem.
I was very reluctant to purchase these because I did not want to design any projects around them only to find out that they are not compatible or that they are not stable or even worse that I would get some bad ones and spent my time troubleshooting a prototype. But given the price (less than 4 bucks at the time of this review) I could not resist giving them a try. Since then, I have purchased a dozen or so and I am pleased to say that they all worked flawlessly no matter what I used them for. I have connected to these little boards an array of analogue sensors and used them to control 2812 LED strips without a problem. Some projects like the board in the pictures have plenty of code running to deal with multiple photo resistors, led lights wireless communication and self calibration. This Arduino compatible board is not just a good inexpensive solution but it allows us amateurs to make some prototypes that can have small footprint and this is something that has always been a challenge (at least for me). No matter what your projects look like today and even if this little board does not offer enough inputs or outputs for you, if you are using Arduino boards, there will be a time that a nano board like this will come handy so go ahead and get some even if you are planning to just have them in your toolbox for the time being. I personally have a couple around just in case I have an idea and I just need to plug one on a breadboard to test a sensor or something. Because to me having an Arduino that I can just plug on a breadboard is priceless.
A**R
High quality unit. Worked right out of the box. Good instructions
I needed an interface between Windows 10 and my universal remote program jack. The software program from the JP1 site recommended using a Nano board and provided the Nano sketch. I purchased the ELEGOO brand based on the Amazon reviews. They arrived on time, and I downloaded the instruction manual from the Amazon page. per the instructions, I downloaded and installed the Arduino program on my Windows 10 desktop. I connected one of the Nanos to a USB port and the Arduino program recognized it immediately without installing the ELEGOO driver. The Sketch loaded without problems and the interface works. The only issue is that I didn't realize how tiny the Nano is. Soldering the connections was challenging but I have a very fine point soldering iron and decades of experience. For those not experienced with soldering very small connections I recommend buying units with the jumper pins already soldered on the board.
J**R
Simple, Easy Setup with Current Shipped Product
Review written 12/28/2018: I'm a complete Arduino newbie, with just one week with a standard UNO r3 under my belt, but I had no trouble getting these ELEGOO Nanos to work perfectly. Here's my experience: I downloaded the IDE a week ago from the Microsoft Store, and the installation was flawless. I've been using it about a week with my UNO and various sketches that I wrote, including one using the IR remote to command two types of servos. When I received the ELEGOO Nanos from Amazon and plugged one in, a compatible driver was found automatically by Windows 10. I verified this by going to Device Manager>>USB controllers, and there were no exclamation points. I then went to Device Manager>>View>>Show Hidden Devices, then Device Manager>>Ports. I saw an entry USB_SERIAL CH340 (COM4), which looked like the Nano. The Blink demo seemed to be already running. Then I went to IDE>>Tools>>Board and selected Arduino Nano. Then IDE>>Tools>>Processor and selected Old Bootloader. Then IDE>>Tools>>Ports and selected COM4. I loaded the sketch for Blink into the IDE and changed the on-time to 3 seconds, and hit the upload arrow. It worked as expected. Then I loaded my servo/IR remote sketch after rewiring to the Nano, and the program worked as expected with the smaller servo, but choked on the larger one. I changed the power supply to the servos (only) to a 4 AA cell battery pack, connected the grounds of the Nano and the AA cells, and both servos worked perfectly. ELEGOO must be shipping a better product now that what earlier reviewers had to suffer through. I learned from their hard work. Five stars for me... Pic shows a breadboard with UNO r3 (disconnected) and Nano on it, two servos, IR remote and battery box. LEGO train switches are now remotes. Grandson is happy!
Trustpilot
2 weeks ago
1 month ago