
DOWNLOAD THE APP


Customer Services
Copyright © 2025 Desertcart Holdings Limited
DOWNLOAD THE APP


🔧 Nail the perfect deck finish with invisible precision!
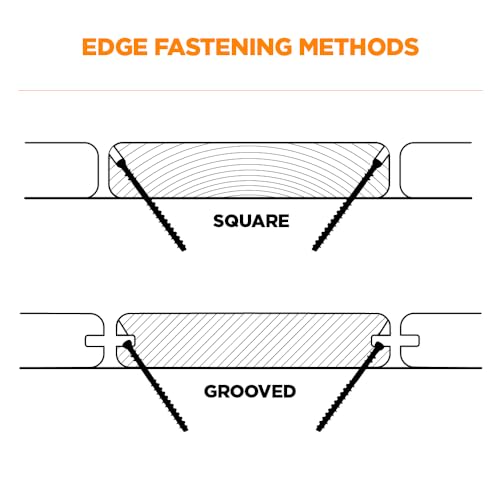
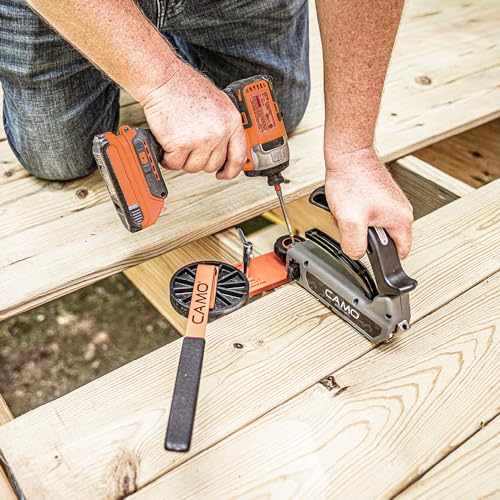
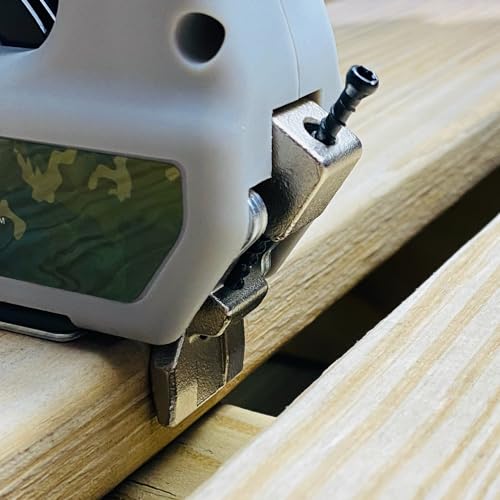
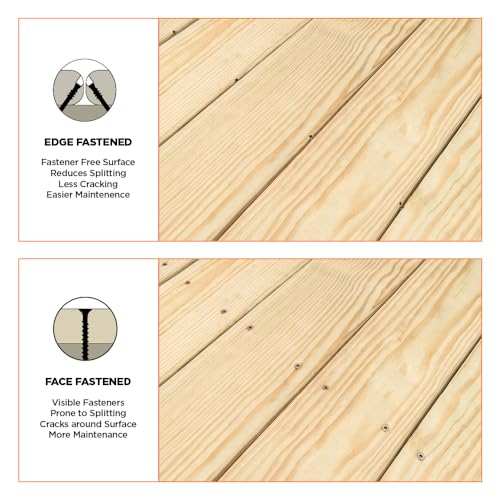
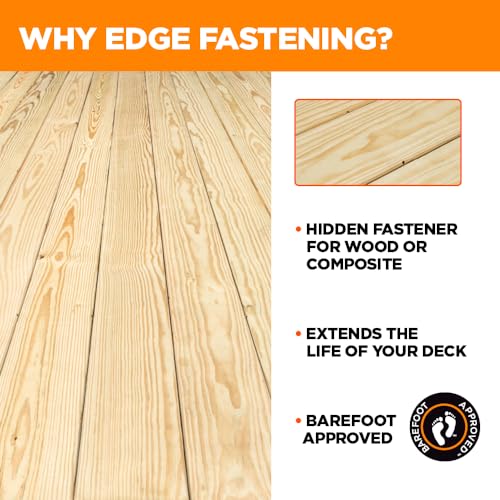
The CAMO Marksman Pro X-1 Wide Board Tool is a professional-grade decking accessory designed to position CAMO hidden fasteners at a precise side angle. It adjusts to fit deck boards between 13.3 and 14.6 cm wide and automatically spaces screws 1.5 mm apart, delivering a flawless, fastener-free surface on wood, composite, cap stock, or PVC decks. Made from durable alloy steel, it’s the essential tool for millennial pros seeking a sleek, modern deck finish that stands out.


| ASIN | 0205062040 |
| Batteries Required? | No |
| Batteries included? | No |
| Best Sellers Rank | 430,973 in DIY & Tools ( See Top 100 in DIY & Tools ) 48 in Decking Nails |
| Colour | Camo |
| Customer Reviews | 4.6 4.6 out of 5 stars (549) |
| Date First Available | 3 Feb. 2014 |
| Folded knife size | 4.975 x 2.55 x 8.2 inches |
| Included Components | Tool |
| Item Package Quantity | 1 |
| Item Weight | 9.07 g |
| Item model number | C345002 |
| Manufacturer | CAMO |
| Material | Alloy Steel |
| Number of Pieces | 1 |
| Part Number | C345002 |
| Product Dimensions | 25.27 x 6.48 x 20.83 cm; 9.07 g |
| Size | Pack of 1 |
| Style | Marksman Tool |
D**E
Really good invisible fixing system
I used this for the boards on my 50 square meter decking. Great fixing system, almost invisible when in place yet you can still get an individual board up if you need to. There's a couple of little tricks you learn and it's a good idea to watch and understand the Camo "how to" videos on YouTube. Especially the one about starting off the first row of boards by a wall. You do need to use their own brand screws because they're the other part of the system. So long as you understand this tool is just one half of the fixing system then you shouldn't have a problem with that.
I**N
Expensive but worth it for a pro look to decking
Good product that drives screw in to decking at an angle therefore orevenmtijg unsightly screw heads
C**L
the end result is fantastic, especially on smooth decking
This was used to install a large decking area and although slightly more fiddly than simple face fixing, the end result is fantastic, especially on smooth decking. It leaves no splinters on the face of the board or sunken troughs for water to sit and work its way past whatever oil/stain you treat the boards with. This was used with very green fresh pressure treated boards, so the 1.5mm gap setting of this tool is just right and I would not advise using any extra spacing. After drying out the gap between boards has now settled at somewhere near 5-6mm.
T**R
decent tool that conceals screws but leave small indentations on the small radius of the board
Being a professional carpenter of 15 years plus i was sceptical of this tool. I actually would have rathered to screw the board through the top. Stainless steel Counter sunk screws on a flat hardwood deck look great when done correctly and are in dead straight lines. My wife wanted concealed so i bought this. Now im fussy esp when i do stuff on my palace so i gave a few trial runs on some hardwood decking off cuts to get a feel. what i noticed are the small divits that where left on the adjacent board after screwing and at times the pre-drill holes on the corner of the board thus rendering the fixings not truly concealed. the gap is only 1.5ish mm so pretty small but ok for site seasoned hardwood. I was not happy with the divits etc so i superglued .9mm piece of small aluminium on the INSIDE of the tool spacing thus increasing the spacing to 2.4ish mm. this reduced the divits and moved the pre drill slightly away from the edge and further down the side of the board thus hiding the hole more effectively. i still got the odd mark which i could live with and visiters could not see anything. overall it best to have a little practice and see what works best for you. defo predrill on hardwood to prevent splitting. on butt joins i predrilled and plugged as splitting will occurs on board ends. i will be using this on next contracting job and overall you can achieve some good results when you tweak it here and there. just be sure to predrill ye hardwood
A**.
Product
Great product and design.
A**R
Great piece of kit - takes effort to use and ...
Great piece of kit - takes effort to use and especially with hardwood as need to pre-drill but the outcome is well worth it
S**N
Well made, solid piece. Taken some abuse while ...
Well made, solid piece. Taken some abuse while making the decking and it still feels as new as day 1.
Z**S
Funciona perfectamente
B**R
This is a great product!!! A deacon with no exposed nail heads looks wonderful. If you want to spoil yourself buy two of these and the project will go 3 times faster. This system will take a bit more time to install than face nailing but the results are MUCH better. If you really want to do your deck the correct way you should NEVER near the end of a board. Look at your current deck. I'll bet dollars to doughnuts that every board that is rotten rotted right where one board comes together end to end with another board and both boards land on one joist. Most would put two nails in the end of each board which splits the ends of each deck board AND puts 4 nails into the joist at the same place. The end to end boards trap water and lead I right down to a joist split wide open by FOUR nails and that is why decks fail. Instead run your deck in sections and do NOT stagger the deck board seems. Put all of the end to end seems in the same place and keep a 1/4 inch gap between each end. The framing below must have one joist which sits back 1 1/2 inches from the end of one deck board and another's joist that sits back 1 1/2 inches from the end of the other deck board. One extra joist every 12 or so feet but a cheap price to avoid nailing at the ends of deck boards splitting them and ruining the joist below. A trick I learned in Fine Home Building magazine years ago. I'd take a bet that this plan, with the Camo screw guide, and a rubbery deck joist cover will double or triple the life of your deck.
S**Y
Works good - except I probably won’t use it to often ,as I only need one deck 😀 The 1/6” gap is the way to go as the boards shrink to a 1/4”gap roughly
C**N
Todo bien
S**Y
Very easy to use. Watched the DIY YouTube finished my deck in two days. Extremely helpful and hides screw holes well.
Trustpilot
1 day ago
1 week ago