Desertcart purchases this item on your behalf and handles shipping, customs, and support to France.
🔧 Elevate your kitchen game—built-in style, zero clutter!
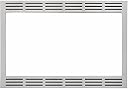
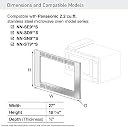
The Panasonic NN-TK922SS 27-inch Microwave Trim Kit is a precision-engineered stainless steel frame designed to convert compatible 2.2 cu ft Panasonic countertop microwaves into built-in units. Measuring exactly 27 inches wide, it fits select models for a seamless, space-saving installation that enhances kitchen aesthetics. Lightweight and DIY-friendly, this trim kit offers a professional finish that complements modern cabinetry while freeing up valuable counter space.
| ASIN | B008D2TZ44 |
| Additional Features | Lightweight |
| Best Sellers Rank | #826,473 in Home & Kitchen ( See Top 100 in Home & Kitchen ) #1,231 in Microwave Oven Replacement Parts |
| Brand | Panasonic |
| Brand Name | Panasonic |
| Capacity | 2.2 cubic feet |
| Color | Silver |
| Controller Type | Touch |
| Cooking Program | Auto Cook, Defrost, Manual, Reheat, Sensor Cook |
| Customer Reviews | 3.8 out of 5 stars 652 Reviews |
| Defrost System Type | Manual Defrost |
| Frequency | 50 hertz |
| Global Trade Identification Number | 00885170073098 |
| Heating Method | electromagnetic radiation |
| Human Interface Input | Buttons |
| Import Designation | Made in USA or Imported |
| Included Components | Trim Kit |
| Inner Material | Stainless Steel |
| Installation Type | Built-In |
| Item Dimensions D x W x H | 0.79"D x 27"W x 18.6"H |
| Item Type Name | 27-inch Microwave Oven Trim Kit for 2.2 cu ft Panasonic Microwave Ovens |
| Item Weight | 8.6 pounds |
| Manufacturer | Panasonic |
| Manufacturer Part Number | NN-TK922SS |
| Material Type | Stainless Steel |
| Model Name | NN-TK922SS |
| Model Number | NN-TK922SS |
| Number of Items | 1 |
| Number of Power Levels | 10 |
| Product Dimensions | 0.79"D x 27"W x 18.6"H |
| Recommended Uses For Product | Residential |
| Special Feature | Lightweight |
| Timer Function | false |
| UPC | 885170073098 |
| Unit Count | 1 Count |
| Warranty Description | 1 year manufacturer |
| Wattage | 1 watts |
P**S
Looks Great - Sketchy Instructions
I give 5 stars for the finished product. But the instructions were sketchy and the installation was a challenge. This trim kit is designed to fit the Panasonic NN-SN9665 microwave. Be SURE you match the right serial numbers of the microwave and the trim kit - a number of customers complained about mismatches. My biggest complaint is the pathetic attempt to save a buck by having the customer bend a flat piece of sheet metal into the shape of a vent and attach it to the oven. The bend lines are identified by perforations but you can easily bend them the wrong way, creating a vent that doesn’t fit! Yep, I did that and had to rebend the thing into the right shape hoping it wouldn’t break because the 180-degree stress. Then you are instructed to tape…yes tape the flanges of the vent to the microwave! No tape provided, so I tried electrical tape which I could see was inadequate so then used strapping tape. Conquered. But we’re not done with this vent yet. As we (it took two of us) tried to plug in and get the unit into the cabinet opening (exactly 27”x17-3/8” as instructed) that dad gum vent got in the way! Fortunately the interior space was bigger than the cut-out opening so we were able to wedge the left side of the unit to get it in and onto the kit platform. Another half inch added to the height dimension would be tempting, but then the corner brackets wouldn’t fit right for the trim piece! I recommend bending that vent flatter. It’s just taped anyway with one screw in the back. Final look - fantastic! Matches our gas oven perfectly. I suppose that vent does it’s job but I hope the engineers would do a better job on new iterations of that stupid vent! We have a much larger cavity than the opening and I was tempted to leave it off - it probably would have been fine. But a tight fit could be a problem with heat and moisture. All said it looks great!
J**A
Looks great
Once I got over the fact that the trim kit costs as much as the microwave, I finally took the plunge and bought this. And I’m glad I did. Mine was going into a cabinet that would need modification anyway, so I wasn’t very concerned about the non-standard cabinet size. I thought the directions were pretty clear, the materials were good quality and packaged well. The complaint about installing the upper left bracket and then trying to fit the microwave in the cabinet is valid. If your opening is cut to the recommended dimensions, the microwave won’t fit in the cabinet with the bracket installed. So I just installed the bracket after I put the microwave in and used a ratchet with a Phillips head to install bracket with pre-drilled holes (it’s a tight fit). Modifying the cabinet was the longest part, but I knew I was going to do that anyway. Because of that, it took me a day to make the necessary cuts, refinish the cabinet surface, and install the trim kit. But once your cabinet is prepared the trim kit install would probably take 30 minutes to an hour, so very simple. The finished product looks great. If you have the space and want a high-end look in your kitchen, then I recommend.
G**F
Expensive for what it is, terrible instructions, and difficult to install.
This is a VERY expensive piece of trim, that leaves quite a bit of space around the microwave and uses plastic clips to hold to the cabinetry. Because of this, there is almost no flexibility on the install, and you need to make absolutely sure your cabinet is to the letter to use it. Because this microwave was replacing an older microwave, while the new microwave was nearly exactly the same size as the old one, the cabinet needed to be almost 2 inches wider JUST because of the trim piece. Unlike some older trim kits there is nothing that is screwed into your microwave- the feet nest into the metal tray you put into the cabinet- so we'll see how it holds up. For being almost as expensive as the microwave, it was surprisingly janky. Make absolutely sure you have the right trim piece for your microwave and the correct size for your cabinet or you will be in for an unpleasant day. While it looks okay once in, the cost for value, difficult to understand instructions, and very large cabinet relative to the microwave this requires are all good reasons to give this (and the microwave it fits!) a pass if you can find something else.
T**Y
Very nice stainless setup for my non-Panasonic oven.
Nicest trim kit I could find but kind of pricey as it cost almost as much as the actual microwave...But It is real stainless steel at least as some of them are not. I used this trim for my Whirpool WMC50522AS 2.2 cu.ft. microwave based on the measurements I thought it should fit... And it did! It is a 3 dimensional part not just a face plate with fake slots. Some mods to my cabinet had to be made (easily trimmed with jigsaw) as directed by the pictures and measurements in the instruction manual. It ended up taking me 2 hours plus a trip to Home Depot to get longer screws for the base mounting and paint stir sticks to use as shims for the base. I also cut a thin plank of wood to set under the microwave to give it better footing as this kit is not actually for a Whirlpool so the feet didn't fit perfect on the base plate. The previous microwave was a Hodge podge install and was not level or square which made this a little more difficult than I thought. This kit comes with the trim piece you see, plus a base plate assembly, hardware, and a vent. I did not use the vent as it didn't fit my microwave and I felt that it was not needed for my application. Looks great! A lot better than my picture frame style trim on the previous microwave.
J**O
Trim Kit needs to be re-engineered by Panasonic. It's the only option for Panasonic NN-SD975S
Three problems: (1) Interior height is different than listed in the manual. (2) Brackets are not designed for standard cabinetry. (3) Steam exhaust hood is an inch too tall, given the trim kit's necessary mounting bracket locations. I thought I was doing good reading the manual from Panasonic before buying this trim kit. Alas, the manual is wrong... Specifically, it states that the vertical interior dimension needed for the kit is 17 3/8 inch +/- 5/64. In reality, the kit requires 18 3/8 inch. An inch is a lot when you're replacing an existing microwave made by GE (it fried two magnetrons in three years of light usage and couldn't make microwave popcorn without shooting plasma bolts). Despite the terrifying problems my GE microwave had, it did fit perfectly in my cabinet. It also sports exactly the same outer dimensions that the Panasonic Microwave oven NN-SD975S has. And yet, the interior dimensions needed for the Panasonic trim kit are a full two inches of height more than the trim kit for my GE. Whereas the GE trim kit made use of the facing cabinetry around the cabinet for mounting brackets (nicely obscured by the outer trim), the Panasonic trim kit uses only the interior space for the trim. The result is that the Panasonic outer trim's top edge is a full two inches higher than the GE model, that was nicely centered in the cabinet. After doing much carpentry, replacing the standard 3 inch top cabinet facing panel with a handmade 1 inch tall one (oak for strength ... see bracket notes below), I was able to get it to fit. The brackets are about 1 1/2 inches deep, yet the cabinetry uses 3/4 inch wide wood. The holes of the brackets aren't centered for 3/4 inch wide wood. The #6 screws provided are minimally viable, apparently reduced in size as a result of "Value Engineering" and only 8 screws were provided for the 16 bracket holes. (the diagram in the manual shows that you're supposed to only put screws in half of the bracket holes, with one of the screws put in the back pair of holes that extends over air space due to the 1 1/2 inch bracket depth and 3/4 inch cabinet wood depth.) I reused my GE trim kit #8 screws that provided a superior, firm hold, especially on the MDF cabinetry (use wood glue for extra firmness). I chose solid oak wood for the replacement of the top face portion of my cabinet to ensure that the top brackets would hold tight. The exhaust hood was clearly an afterthought by the Panasonic Engineers. With a back side vent on the microwave, moisture was certain to be a problem. It appears that someone watched the movie Apollo 13 and decided that the way to go was with some sheet metal that you could bend into shape and some tape to hold it to the microwave. I laughed when I saw the reinforced tape threads running the length of the tape, whereas the stress is from edge to edge of the tape. The adhesive isn't the long-lasting type. After bending the metal according to the instructions and taping on to the microwave and attaching it with a single screw on the back (for good measure?), I began to have my doubts. The instructions had stated clearly that all folds were to be 90 degrees, and my assembled result looked identical to the manual's illustration. The problem was that the exhaust hood was a full 2 inches tall above the top edge of the microwave and the required placement of the Trim Kit's face panel mounting brackets allowed for just a single inch of height for an exhaust hood. Then I remembered the instruction comment about 90 degree folds. The solution was to rebend the metal, using a hammer and wide pliers with a 45 degree angle on the top and a complete rebend of metal on the side, reducing the height to just under an inch. The result looks ghastly, but it does fully direct the exhaust air to the front where it exits from the trim kit faceplate's grill. I used some Gorilla Duct tape (moisture resistant and super-tough) in addition to the included tape. The final result looks very acceptable. It sure would've been nice if it had been centered vertically like the GE trim kit was. Despite this, no one is likely to notice this vertical issue because the microwave oven does fit perfectly within the trim kit's front face, everything looks both horizontally and vertically centered, and the gaps between the trim kit face and microwave oven are less than 1/8 inch (when used with Panasonic microwave NN-SD975S)
J**R
Easy install method for non-conforming spaces
I had to make some adjustments to get the microwave and trim kit to fit the space vacated by our old, broken microwave. The previous space was smaller than the specs required for this trim kit. The solution was MAGNETS, and it worked fantastic! This solution could probably even be used over the standard installation as it allows plenty of wiggle room for positioning the trim frame. I placed the new microwave directly on the shelf and did not need the metal riser. I installed a metal corner bracket to the shelf in back to help position the microwave depth-wise in the opening and attached the left duct as recommended. I installed 3 in. metal ties to the outside of the cupboard inside of where I wanted the corners of the trim frame. Instead of using the mounting hardware provided, I purchased four magnets from the Home Depot (2 x 2-packs of 3/8 in. x 1/2 x 1-7/8 in. Heavy-Duty Block Magnet, $8 each) Note, the dimensions and strength of the magnets are important. I had to include a spacer as there is a bump on the inside of the trim kit frame that prevents the magnet from lying flat - I cut pieces from a paint stick and it was just the right width to make the magnets flush up to the metal ties when positioning the frame. See photos for the assembly (they unfortunately did not post in the right order).
S**E
Beautiful trim.
The trim is exactly as is shown and fits our microwave perfectly. The installation instructions were a bit confusing (different steps for different sizes of microwaves and cabinet openings, all on the same page) but we managed. We had to cut out a bit of the wooden cabinet surround to make it fit, but that’s not the trim problem - our cabinet opening was a tad smaller than the size needed per instructions. But once we trimmed the excess, it fit and looks beautiful.
A**.
Looks nice...
I installed this with the purchase of the Panasonic NN-SD975S, which is a great unit so far (only been a week). The kit was easy to install... directions are images.. but it's common sense on how to install this. The frame, at first, looks too big for the microwave, but after installing it and understanding you need a little open space for the door to swing into, it looks fine. The photo they show looks like the frame fits tight around the unit, but it doesn't, which is normal. So, don't freak out when you put it up to the microwave at first. Once you install it, it looks great, even with the 1/2"-3/4" openings on each side and about 1/4" at the top and bottom. It's the way is should be.
J**E
Beau et bon produit
Produit conforme à ce qui était montré. Livraison rapide et sans problème. Colis bien emballé. Pas facile d'installation car instructions pas assez détaillées. Vous devez avoir les dimensions exactes pour un fini parfait. Très, très beau autour de mon micro-onde Panasonic. Il a fallu beaucoup de patience pour l'installer mais le résultat est super !! Très contente de mon achat. Prix est de quelques dollars de moins que dans les magasins mais la livraison est plus rapide.
S**L
Not satisfied yet. Still waiting for the refund for the returned item.
This very nice trim for my microwave did not fit. I returned it to Amazon 2 weeks ago (September 17/20) but have not been refunded. My new microwave oven from Amazon is fine and it is installed here in my kitchen. However, the communication from Amazon shows that I have returned IT. Please remedy this situation, Amazon, and refund to me the cost of tje microwave trim kit which I HAVE returned.
K**P
Works, but high level of difficulty
This is probably a good option if you are doing a new kitchen build, buy the microwave and trim kit in advance, and then order your cabinets after you read the instructions for the trim kit. Otherwise, expect a challenge as others have mentioned. I was replacing a microwave and trim kit in an existing 27" cabinet and while the width was correct, you need exactly 17 3/8" height between the bottom shelf and the top one to mount the brackets. Once you install the brackets, don't expect to just slide that microwave in. you're going to need to remove that top left one to cram it in with the extra exhaust vent you need to attach to the top of the microwave and remount the bracket last. Overall it works, just a bit of challenge if you don't have a lot of tools.
C**G
need to redesign
hard to install
C**A
Good looking
Very good looking… expensive for sure. We needed it.
Trustpilot
2 weeks ago
1 month ago