Description
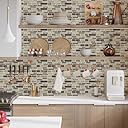
✨ Peel, Stick, Impress: Instant Wall Glam Without the Fuss! 🏡
- DURABLE DESIGN - Crafted from eco-friendly, heat and moisture resistant materials that stand up to kitchen and bathroom challenges.
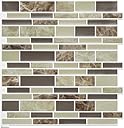
- 3 D GEL LIKE TEXTURE - Not just a sticker—premium ceramic-look tiles add depth and sophistication to any wall.
- EFFORTLESS ELEGANCE - Peel and stick installation means zero mess, zero hassle—upgrade your space in minutes.
- MAXIMIZE YOUR MAKEOVER - 12"x12" tiles cover 40% more area than standard 10"x10" for faster, bolder transformations.
- VERSATILE STYLE UPGRADE - Perfect for kitchen backsplashes, bathroom walls, laundry rooms, and more—DIY luxury at your fingertips.
Vamos Tile offers 10 sheets of premium 12"x12" peel-and-stick 3D wall tiles that cover 40% more area than standard tiles. Made from eco-friendly, heat and moisture resistant materials, these ceramic-look tiles provide a durable, stylish backsplash solution that installs quickly without tools—ideal for kitchens, bathrooms, and beyond.