


Buy anything from 5,000+ international stores. One checkout price. No surprise fees. Join 2M+ shoppers on Desertcart.
Desertcart purchases this item on your behalf and handles shipping, customs, and support to France.
๐ Upgrade your Fordโs style with zero hassleโbecause details matter!
The Dorman926-451 Passenger Side Windshield A-Pillar Molding is a vehicle-specific, direct replacement trim piece designed for select Ford models. It restores the windshield pillarโs appearance to like-new condition, installs easily without special tools, and has been rigorously vehicle-tested to ensure perfect fit and durability.


| ASIN | B07P3FRF1P |
| Automotive Fit Type | Universal Fit |
| Best Sellers Rank | #433,656 in Automotive ( See Top 100 in Automotive ) #468 in Automotive Window Moldings |
| Brand | Dorman |
| Brand Name | Dorman |
| Color | Multi |
| Customer Reviews | 4.2 out of 5 stars 955 Reviews |
| Exterior Finish | Machined |
| Fit Type | Universal Fit |
| Global Trade Identification Number | 00037495940122 |
| Included Components | 1 Inner Bracket; 1 Outer Molding |
| Item Type Name | Windshield A-Pillar Molding for Select Ford Explorer Models |
| Item Weight | 2 Pounds |
| Manufacturer | Dorman Products |
| Manufacturer Part Number | 926-451 |
| Manufacturer Warranty Description | Limited Lifetime |
| Material | Plastic |
| Material Type | Plastic |
| Model Number | 926-451 |
| OEM Equivalent Part Number | BB5Z-7803136-AB; BB5Z7803136AA; BB5Z7803136BA; BB5Z7803144AA |
| Surface Recommendation | Pillar |
| UPC | 037495940122 |
| Unit Count | 1.0 Count |
J**J
Fine Replacement for OEM
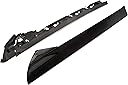
I just installed this set on the passenger side of a 2013 Ford Explorer Limited to replace the existing trim that had come slightly loose and was vibrating at speed. I had a windshield replacement a couple of years ago, and I suspect that the original got damaged during that operation. Upon removal, I found out that both the inner and outer pieces had damage. Notwithstanding what the Ford engineers originally intended, these pieces are essentially sacrificial - once removed, they are toast and must be replaced. This set looks like a factory piece, and it installed exactly the way I expected after watching numerous videos online. It did NOT come with instructions, so it is essential to do your research beforehand. It cannot be overstated how important it is to be slow, careful, and patient when installing this. Between bolts and clips, it attaches to the vehicle in fourteen (14) places and must fit around the windshield, door, hood, and fender. Test fit it multiple times because, once you expose the adhesive strip and/or start snapping clips in place, it's very difficult and risky to try to go backward. Some tips: 1) use something like a wax pencil to mark the locations of the clips on the outside of the outer moulding (write on the protective plastic), so you'll know where to press (gently!!!) to get the clips to snap in 2) start all bolts before tightening any of them; the included soft rubber washers can get in the way, so go slowly and do not cross-thread anything 3) check that the top clip on the existing inner moulding did not remain stuck in the vehicle; if it did, gently pry it out 4) the adhesive sealing strip along the windshield side of the outer moulding is very, very tacky - the protective strip kept tearing as I tried to remove it (it must be removed before you press the moulding into place); this is most delicate and frustrating step; once again, patience pays off The bottom line is that I have no reservation in recommending this. The only feedback I might have for the manufacturer is to make it easier to remove the protective strip covering the adhesive. My plan was to pull one end of it off the side and then use this "tail" to pull the remaining part off once it was on the vehicle and I was ready to snap the clips in place. My plan was foiled when the strip kept tearing into small pieces and I had to back-track. I'd give this 4.5 stars, if that were an option, due to this issue.
D**R
Great value and easy installation
I Purchased the passenger side replacement trim after the old one flew off and was damaged. Itโs important to note this is the second time the original piece flew off, the first time was the driver side on my 2012 Ford Explorer. The trim piece came with all the necessary hardware and rubber molding. The installation was easy and it looks just like the oem one on the other side. Just ensure to remove all old adhesive rubber or silicone that might be under the old one. Do not pull the release paper on the backside of the adhesive adhesive strip until all plastic tabs have clicked in and the piece looks lined up. It helped to have the car door open to access the โAโ pillar. Hope this review helps you with installation!
J**S
Donโt waste your money one the over priced OEM part
It was not a perfect fit very very close, however neither was the left side OEM part. the design I feel is better than the left side I replaced with an OEM part. The price was a quarter of the Ford OEM price. You can only see the mild difference upon close inspection. The rubber gasket that rests along the window glass on this one I preferred over the OEM part. Overall it is a better item on quality and fit.
A**R
Ok
Not too hard to install but it'd be nice if it included instructions. Will update if anything goes wrong.
M**A
Twisted and would not align. Poor fitment.
The piece fit nicely with the lower clips. The upper portion of the exterior facing trim was twisted and would not fit. I let it sit in the sun, so it would warm up in the hopes it would become flexible enough to clip in. I was able to get the clip to engaged, but it sheered the uppermost clip in half when i released the part. I see reviews where the part fits perfectly, unfortunately mine did not. Good luck with yours.
J**Y
Hereโs how to install this correctly
These work great and are essentially the exact same thing you would get from Ford. Hereโs my advice no matter where you buy this part from. YOU HAVE TO USE ADDITIONAL SILICONE ADHESIVE! IF YOU DONโT, it will eventually separate enough from the body of the car that it catches the wind and IT WILL SHATTER. I used one made by loctite designed specifically for adhering trim to cars. I put it on every connection point where the clips attach. You can find it at any local auto parts store. BE CAREFUL WITH THE ALIGNMENT OF THE LITTLE WHITE CLIPS. Take your time, and be gentle when pressing the top piece into the base. If you donโt, the clips will break. This is the same no matter where you buy this part from. Trust me, Iโve done it. If you follow the advice above it works just fine. I replaced mine 6 or so months ago, and Iโve driven thousands of miles with no issues.
W**D
Perfect Fit!
Fit perfectly. I was a little worried but read a few reviews with some good tips. 2017 Explorer Sport. There a recall on these โA Pillar Trimโ sections because they obviously break off/blow off which was what happened to me. Local Ford Dealer said that these arenโt available nationwide, anywhere. So, I Looked them up on Amazon and voila- 2 days later, installed and ready to go. Iโm so impressed, Iโm going to order the drivers side section and install it preemptively, as itโs a little loose at the top. 5*. Thereโs one review where the guy gives some good advice. Iโm adding it below on this review because it was helpful credit to the guy who originally wrote it: He writes: โMy online search gave me three good tips: 1. The first tip: there is a tab at the very top of the window trim that is in the car itself and not part of the window trim kit. If you don't remove it first then you will never be able to install the trim. I had to pry it out with a screwdriver and break the clip to get it out. 2. The other tip is to start the install at the bottom of the window and work your way up first . The bottom needs to be in the right place for all the screw holes to line up for the install kit - Same goes for the trim molding that snaps on top of the install kit start at the bottom. I was also warned to not over tighten the screws that attach the install kit for fear of snapping the plastic. The Dorman plastic was very sturdy I think you would have to crank down really hard for this to happen.โ Thanks Dorman.
R**N
Easy Installation on 2011 Ford Explorer
We bought a used 2011 Ford Explorer and the A-Pillar trim snapped and flew off on our very first road trip. The inside pillar piece was damaged and so it had to get replaced too. Installation was easy--even though there are no instructions. Fit was perfect. In hindsight, pictures would be helpful, but here's the steps I took: 1. Remove existing inside pillar trim. Save the bolts. 2. The very top most piece of the outside trim snaps into a hole in the frame of the vehicle. When the old one snapped off, it left its clip in that hole. Use a plastic putty knife to get it out without damaging the paint. (Even though it's covered, don't want to scratch the paint and allow an intrusion point for rust. 3. Install the inside pillar trim piece. Start at the bottom. Make sure to line up the holes exactly with the bores in the frame. There's a small peg at the top of the inside piece that goes into a hole in the frame to make sure it stays aligned, I guess. I put all the screwbolts in with moderate pressure, then went back around for a final tightening pass. No need to crank on them. Hand-tight is fine. 4. Install the outside trim piece. It has a piece of backing paper that you need to pull off that reveals the strip of adhesive that lets it stick to the inside pillar trim. Go ahead and peal off the plastic protection film on the outside, too. Now comes the part where you just go for it. Start at the bottom, and make sure you've got the clips on the underside of the outside trim lined up with their corresponding holes on the outside trim. I used the heal of my hand to smack the outside trim piece so it snaps into the inside trim piece. Start at the bottom, and work your way up. Should be flush. If it's humped up, its not in the clip and you need to give it another smack. And that's it. Good luck!
O**R
SUPER RECOMENDABLE
Excelente producto!!! Muy buena calidad a mitad de precio que la pieza original. La puse yo mismo sin ningรบn problema, solamente no hay que apretar mucho los tornillos superiores porque se levanta un poco el empaque de hule del parabrisas.
M**S
Replace the original item
Perfect fit
J**A
Fits perfect, easy to install!
was nervous ordering online but it fits perfect and was easy to install.
Y**Z
excelente producto
este producto cumple con todas las expectativas de remplazo para la moldura de la ford explorer. yo mismo lo instale sin problema alguno. muy recomendado. ademas el producto me llego en la mitad del tiempo que marcaba el envio.
F**N
not happy
I orderd this product as this had swift delivery next day, however upon our receipt of the package, the product was damaged and its outer trim was broken into 2 pieces whereas the inner part was perfect and replacement gave me an option of delivery in min 2 weeks time.
Trustpilot
2 weeks ago
5 days ago